
How to implement authentication from scratch with ReactJS, Express, and Auth0
Part one: Login flow


Authentication is the most crucial part of any application and implementing one from scratch would be too much of a pain and waste time and resources. Luckily for us developers, there are many authentication solutions available ready for integration such as Auth0, KeyCloak, ORY Hydra. With just a little integration code, we can add SSO to our application easily.
In this tutorial, I'll use the most popular modern web application stack ReactJS (CreateReactApp) along with ExpressJS on the server-side for the base of our application.
For the authentication part, we'll use Auth0 for a quick demonstration, but I will not rely on the package provided by Auth0 to make our code as platform-independence as possible. Doing it this way will help us with plugging another platform in the future.
- Final source code: Github
- Demo application: Application
The project
Since every developer (including me) seems to love Rick and Morty, let's create a simple Rick and Morty wiki page, where users can create an account and bookmark his or her favorite characters.
We'll start with a standard client-server boilerplate:
- Create React App on the client-side. We'll use Material UI for web components,
reach-routerfor routing,react-queryfor performing API calls. There's nothing special about these packages. Most of the setup code is inclient/src/App.js - Server-side: Restful API using Express JS.
- For data, We'll use the
ne-dbpackage to read/write data from a database file instead of having to set up a fully-fledged MySQL. We'll use the Rick and Morty API here cached the data in ourne-dbdatabase file inserver/data/characters.db
For the overall coding experience, we'll utilize the Yarn workspace for monorepo and ease of deployment. This is our general source code structure
.
├── client
│   ├── public
│   ├── src
│   │   ├── components
│   │   ├── managers
│   │   ├── routes
│   │   ├── App.js
│   │   ├── config.js
│   │   ├── index.js
│   │   └── theme.js
│   ├── README.md
│   ├── package.json
│   └── yarn.lock
├── server
│   ├── data
│   │   ├── characters.db
│   │   └── likes.db
│   ├── src
│   │   ├── controllers
│   │   ├── data
│   │   ├── middlewares
│   │   ├── routes
│   │   ├── app.js
│   │   ├── config.js
│   │   ├── env.js
│   │   └── helpers.js
│   ├── package.json
│   └── yarn.lock
├── package.json
└── yarn.lock
When going to the root folder and hit yarn start the code will run both client and server code
- Client code is accessible at
localhost:3000 - Server API is accessible at
localhost:8080
In the next sections we'll try to:
- Register and create new Auth0 applications
- Implement login flow. This including a Login button open Auth0 login page, server-side and client code to handle callback, the credential in local storage
- Authentication context to retrieve current users information
Create Auth0 application
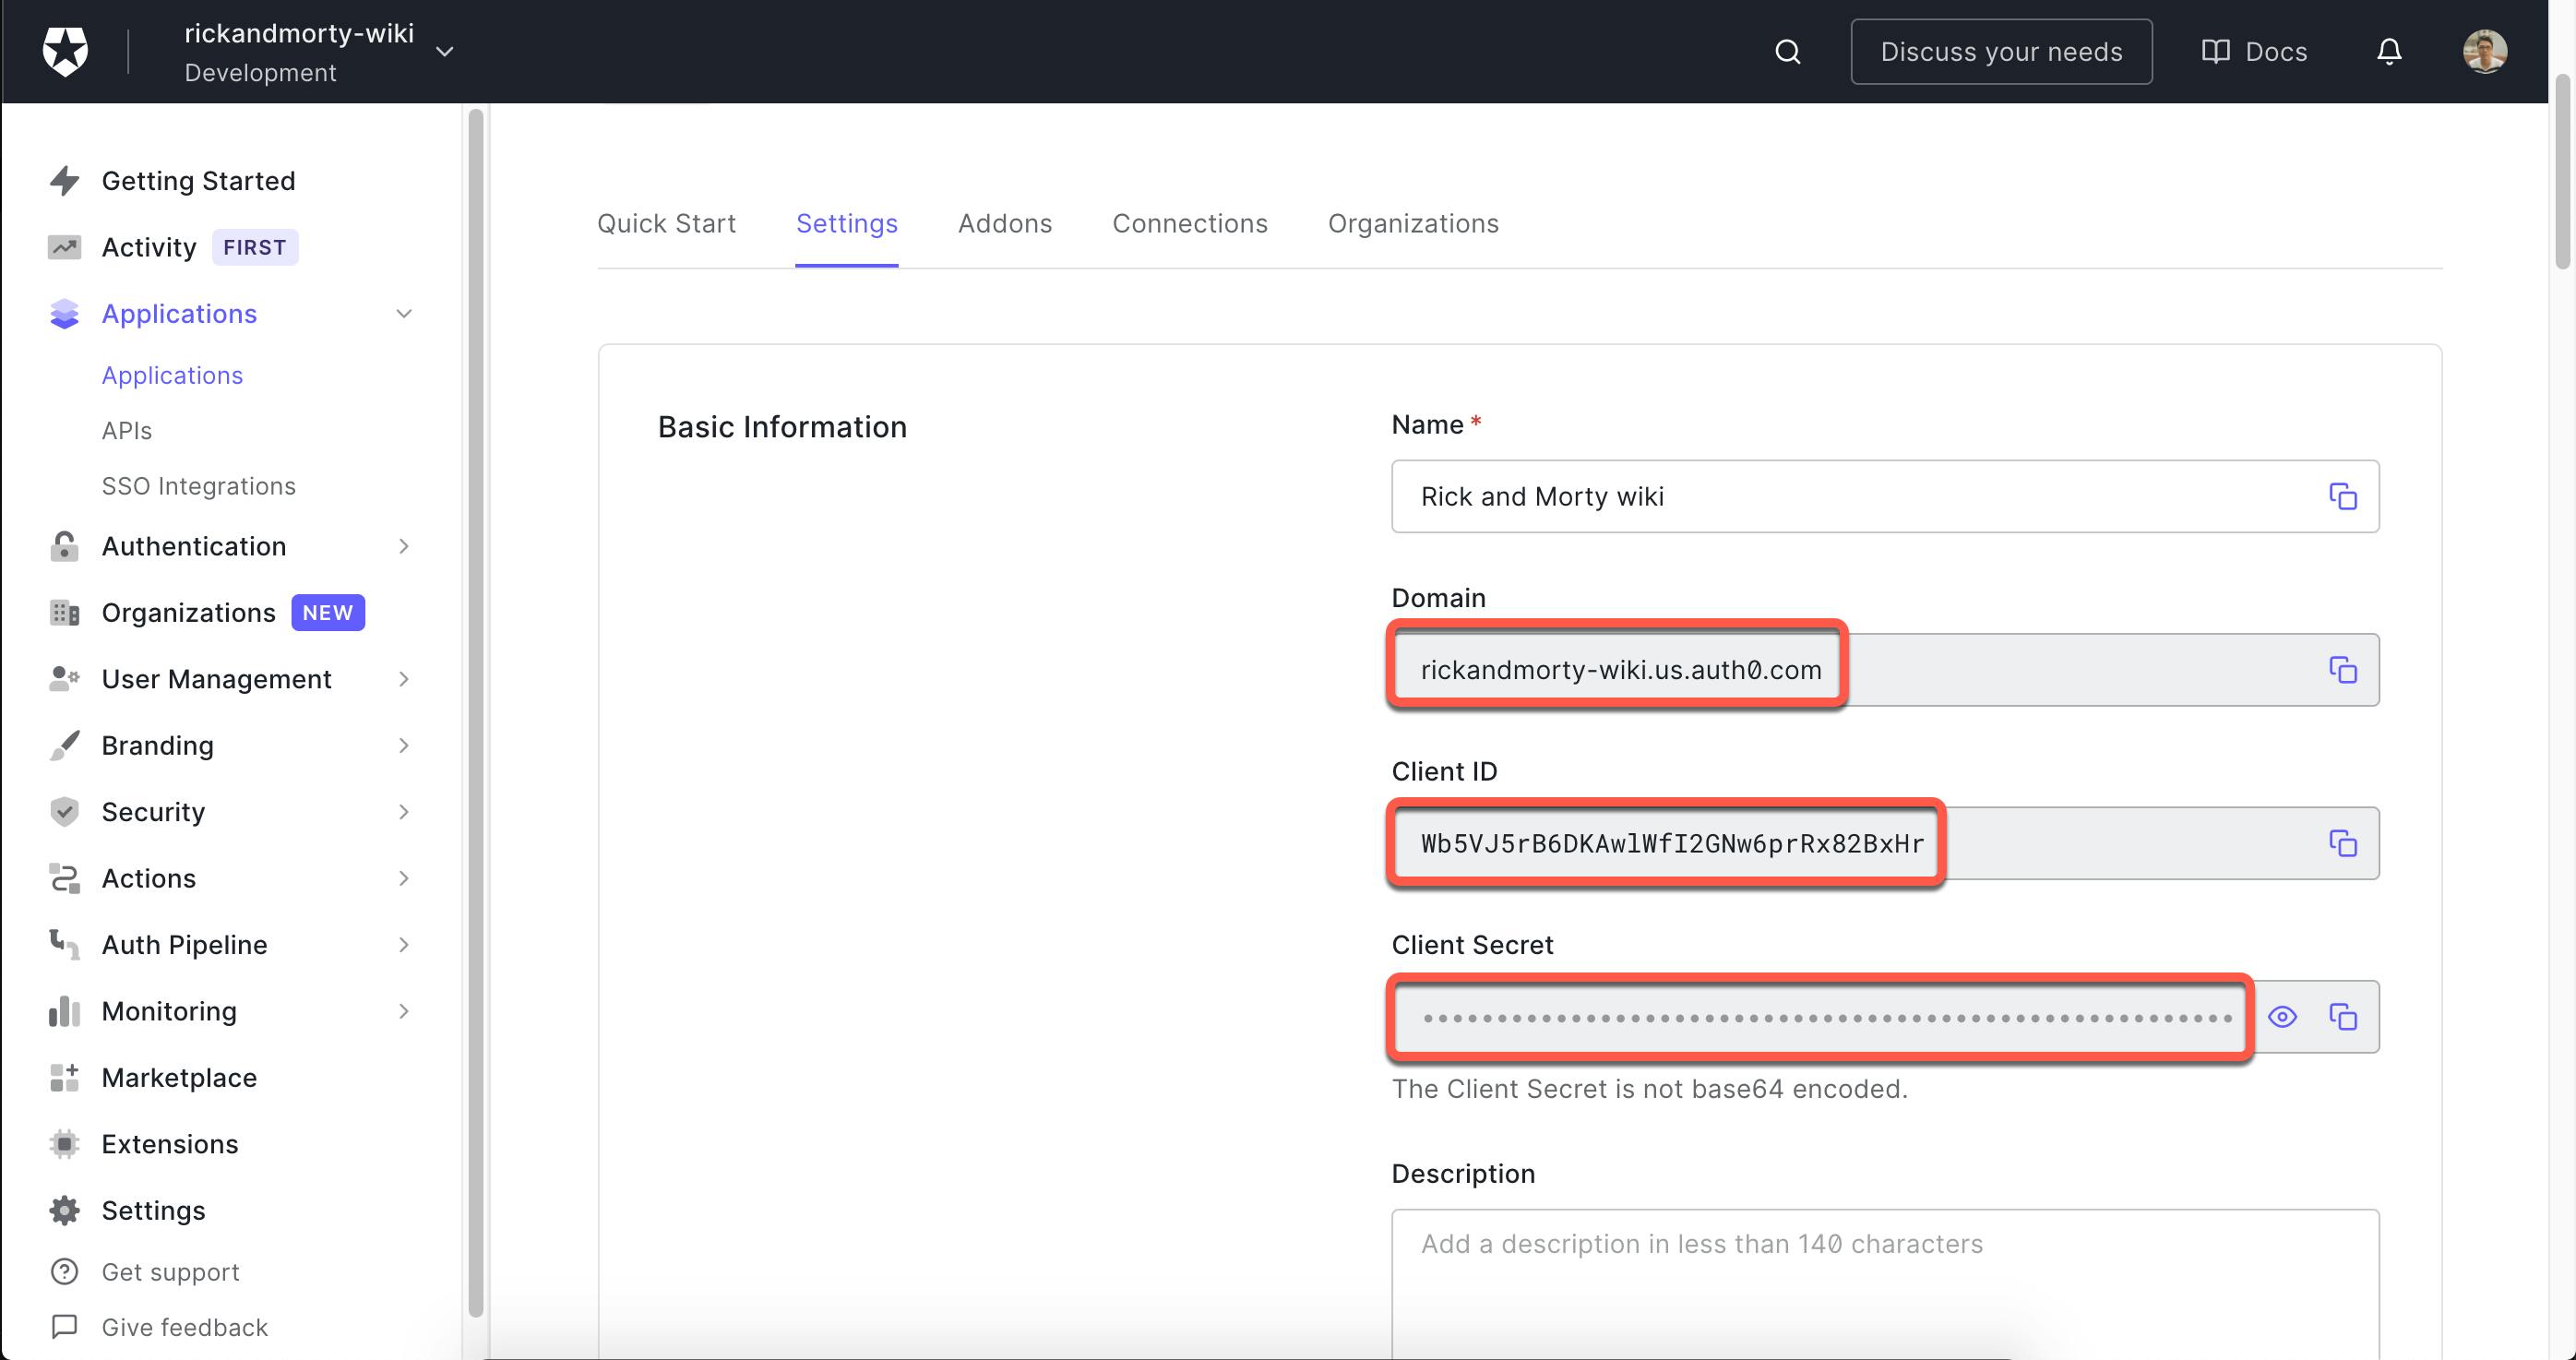
Register new Auth0 application is easy, follow the link Auth0 signup and create a new account if you haven't already had one. After successfully create a new account, go to the dashboard and open the default application. In this screen, note down 3 pieces of information:
- Domain: e.g:
rickandmorty-wiki.us.auth0.com - Client ID: (e.g:
Wb5VJ5rB6DKAwlWfI2GNw6prRx82BxHr) - Client Secret: should be base64 encoded
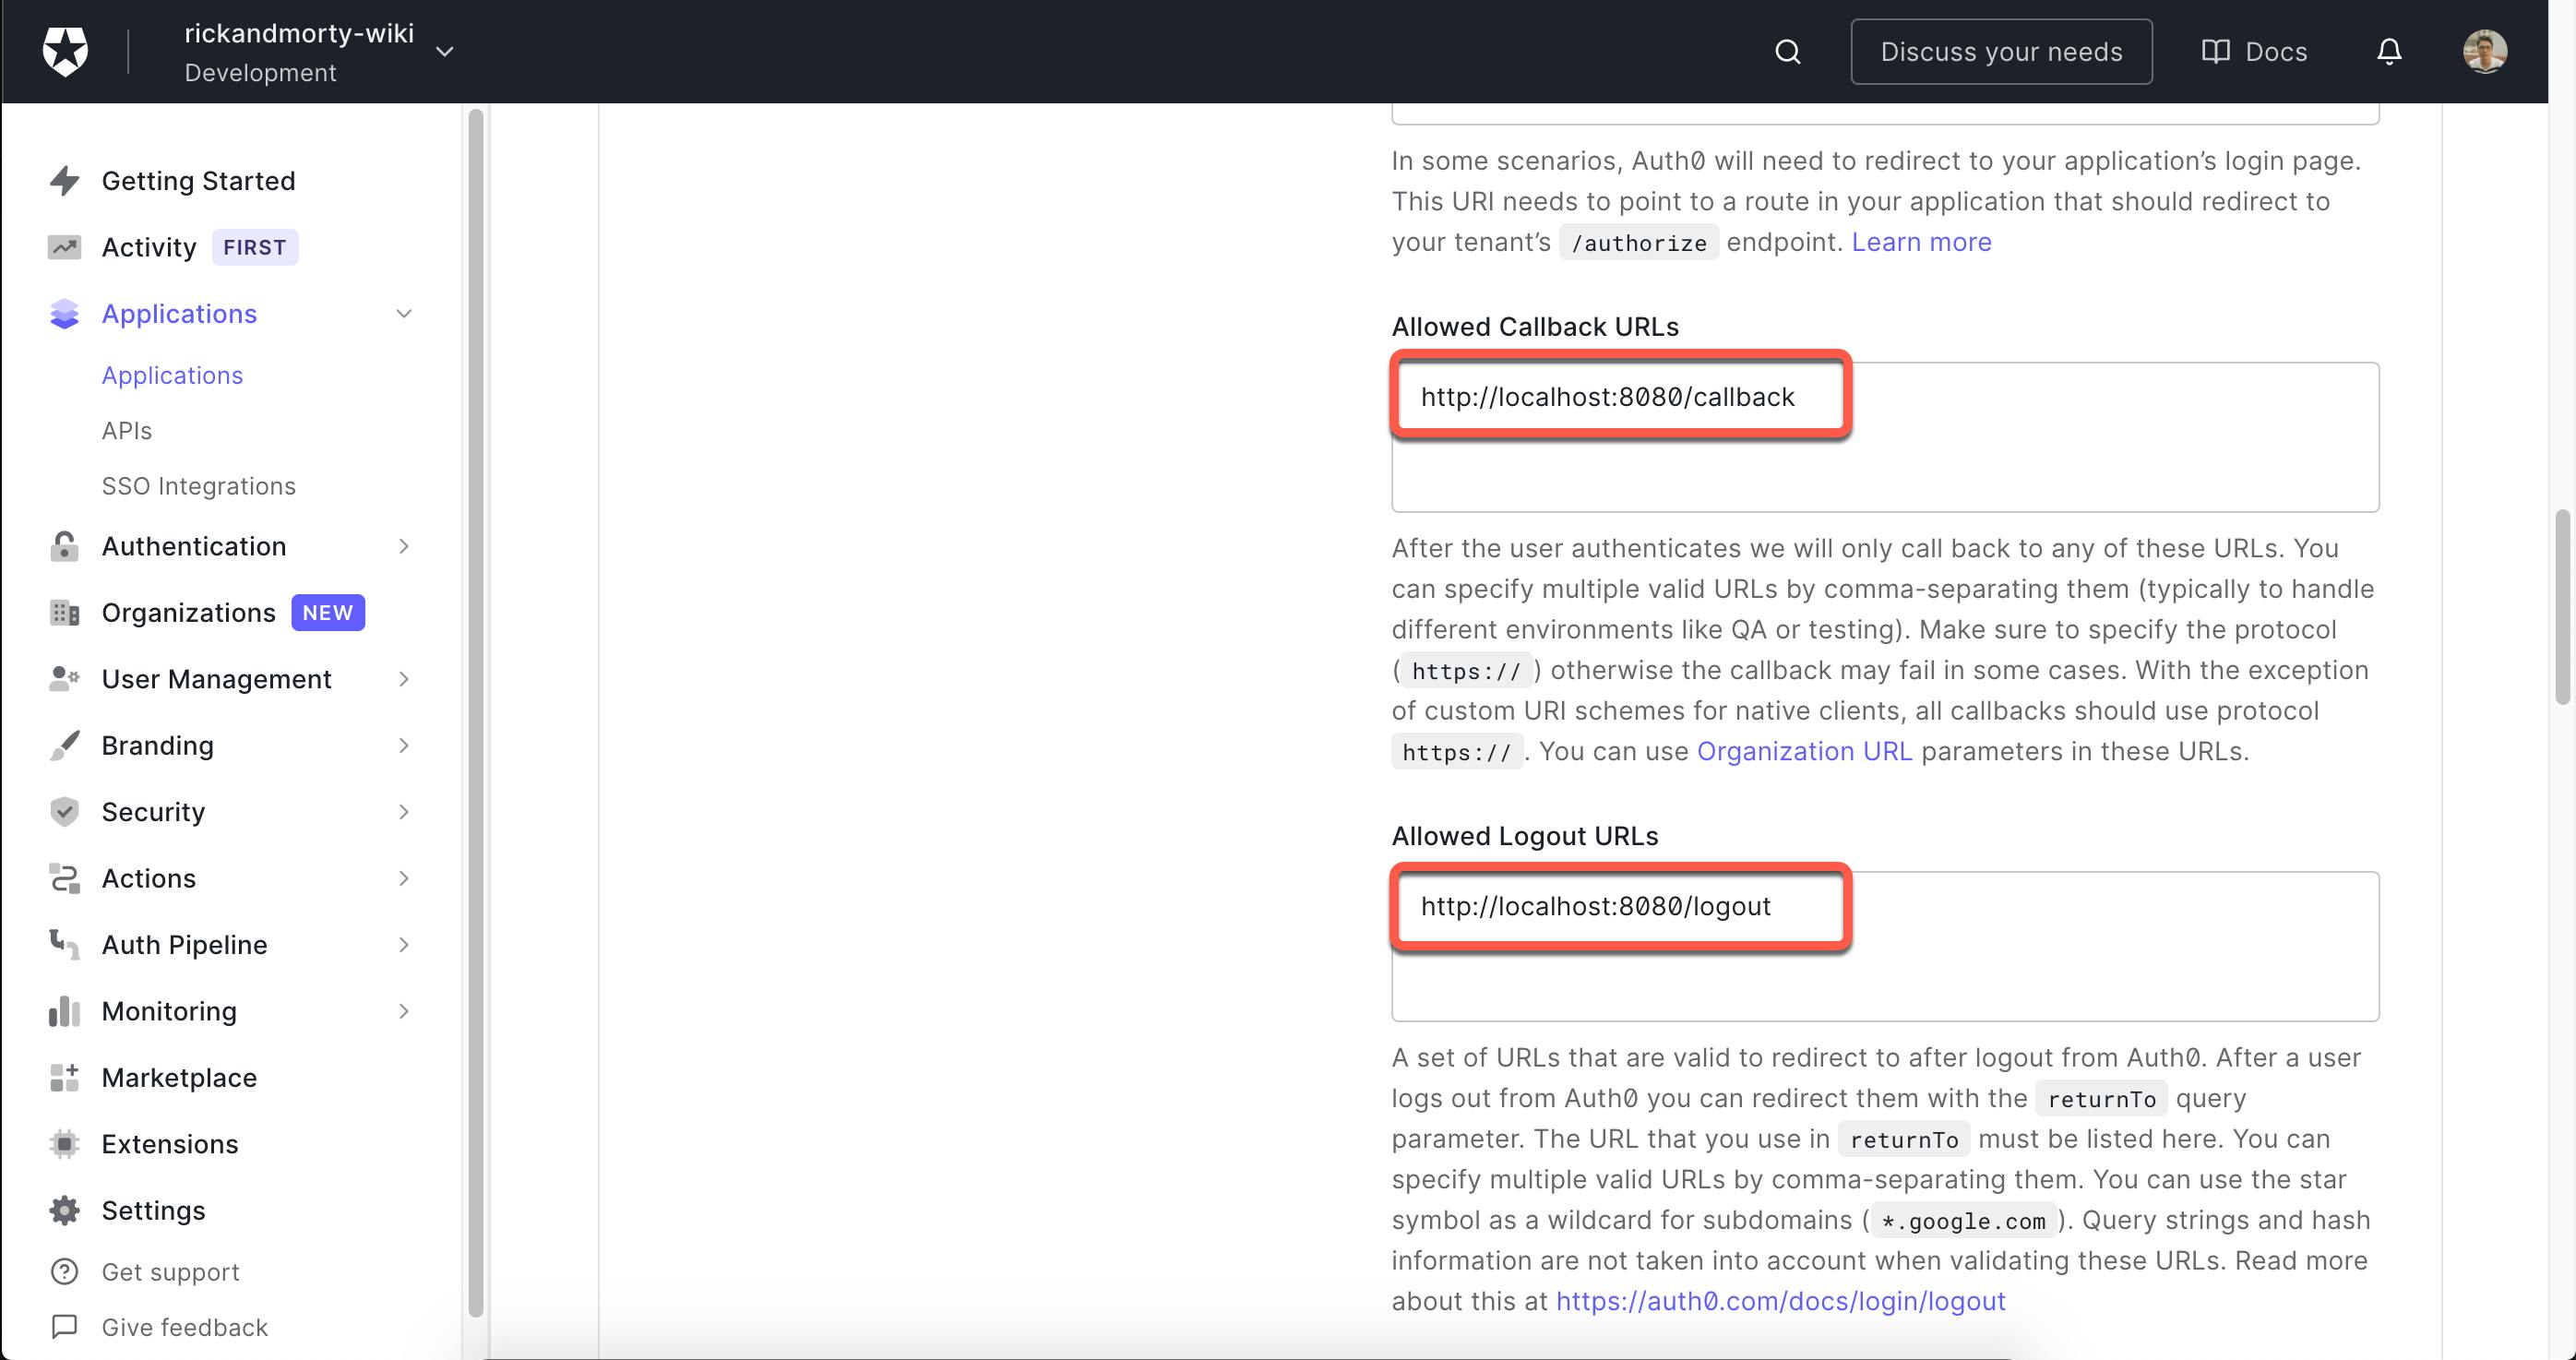
And since we're on this screen, let's change the allowed callback URL and logout URL to our server-side code:
- Allowed Logout URLs:
http://localhost:8080/callback - Allowed Callback URLs:
http://localhost:8080/logout
That's it, quick and easy, and we're done with Auth0. Let's go back and implement some application code right away
Login flow
Login button
The login code start in the client-side code with the implementation of the login URL. We'll need to point to the Auth0 app's login URL. In my case, it looks like this https://rickandmorty-wiki.us.auth0.com/authorize?response_type=code&client_id=Wb5VJ5rB6DKAwlWfI2GNw6prRx82BxHr&redirect_uri=http://localhost:8080/callback&scope=openid%20profile
and this is the code
// client/src/components/urls.js
const createLoginUrl = () => {
    const scope = "openid profile";
    return `${ssoDomain}/authorize?response_type=code&client_id=${clientId}&redirect_uri=${redirectUri}&scope=${scope}`;
};
export const loginUrl = createLoginUrl();
And LoginButton.js
// client/src/components/Layout/LoginButton.js

<Button component="a" href={loginUrl} variant="outlined">
     Login
</Button>
Exchanging code to get token
Clicking this will send the user to the App's login page. After users log in successfully, they will be redirected to our server-side code specified in the redirect_uri parameter along with the code for exchanging the token. This is how the callback URL looks like http://localhost:8080/callback?code=WKm4rHG7MCmLBigF
The next step is to exchange this code using our secret key to obtain JWT tokens from the Auth0 server.
Here is the code for that:
// server/src/routes/callback.js

router.get("/", async (req, res) => {
    try {
        const options = {
            method: "POST",
            url: `${authDomain}/oauth/token`,
            headers: {
                "content-type": "application/x-www-form-urlencoded"
            },
            data: queryString.stringify({
                grant_type: "authorization_code",
                client_id: authClientId,
                client_secret: authClientSecret,
                code: req.query.code,
                redirect_uri: authRedirectUri,
            }),
        };
        const response = await axios(options);
        res.redirect(`${clientUrlCallback}?id_token=${response.data.id_token}`);
    } catch (error) {
        res.send(error.response.data);
    }
});

export default router;
In the code above, we:
- Extract the code from
req.query.codeand send it to Auth0 server along with client_id and client_secret to exchange for the jwt token - JSON serialize the token and encode it in base64 to send back to client code via redirect to client callback URL which is
htpp://localhost:3000/callback
And if you're like me, you must be curious about the Axios response. It's as below
{
    "access_token": "tHcp7OWjiEebnSl49Jk2jsPnBvZEXZQg",
    "id_token": "eyJhbGciOiJSUzI1NiIsInR5cCI6IkpXVCIsImtpZCI6IkQ1WTlzYWtGVE5hQzNwOTlHcnRaeSJ9.eyJuaWNrbmFtZSI6ImplcnJ5X3NtaXRoIiwibmFtZSI6ImplcnJ5X3NtaXRoQGdtYWlsLmNvbSIsInBpY3R1cmUiOiJodHRwczovL3MuZ3JhdmF0YXIuY29tL2F2YXRhci8yMDM0YjAwZjZjMGRjMWI1YzBjMjVmY2Y3NjI3YTdmMD9zPTQ4MCZyPXBnJmQ9aHR0cHMlM0ElMkYlMkZjZG4uYXV0aDAuY29tJTJGYXZhdGFycyUyRmplLnBuZyIsInVwZGF0ZWRfYXQiOiIyMDIxLTA5LTE5VDA1OjAzOjUwLjI0MFoiLCJpc3MiOiJodHRwczovL3JpY2thbmRtb3J0eS13aWtpLnVzLmF1dGgwLmNvbS8iLCJzdWIiOiJhdXRoMHw2MTQ2MDkxNzY0NzA4YTAwNmE0NTA3Y2YiLCJhdWQiOiJXYjVWSjVyQjZES0F3bFdmSTJHTnc2cHJSeDgyQnhIciIsImlhdCI6MTYzMjAyNzgzMSwiZXhwIjoxNjMyMDYzODMxfQ.r_cbjbqB-8pqQ8bPk0IQT_8aUc1rartilWV1dgb8y7zKaVj-QHk9_5Nb9-oMhEjlgdex6MeSJSXeRbEo0Jm1EeImvyxl97cAKTfmDSRp3T_JnuyfE3bBuLe3p0PbIIdkwalKdllpus_p4ctxEbjgiNjldhCwTJI4SQZpj0XfaQUjV4cK5iFRLqIKl1w6XEpu8uL5yBX36I85DHiq-5eqXdlS3T_kttjF4OtOSZrssmWtqvRvN24tuvfiumJkfL3ZdeFiJbM2gG_bw802rx0V1U7YKY6vlbXy6SKYq8dqmXZX-awIp-smSQ48Qz_ipIaib9Mw2SmsdANfEjfhmDKowg",
    "scope": "openid profile",
    "expires_in": 86400,
    "token_type": "Bearer"
}
The id_token part is encoded. If you want to decode it, it will show the following data
{
    "nickname": "jerry_smith",
    "name": "jerry_smith@gmail.com",
    "picture": "https://s.gravatar.com/avatar/2034b00f6c0dc1b5c0c25fcf7627a7f0?s=480&r=pg&d=https%3A%2F%2Fcdn.auth0.com%2Favatars%2Fje.png",
    "updated_at": "2021-09-19T05:03:50.240Z",
    "iss": "https://rickandmorty-wiki.us.auth0.com/",
    "sub": "auth0|6146091764708a006a4507cf",
    "aud": "Wb5VJ5rB6DKAwlWfI2GNw6prRx82BxHr",
    "iat": 1632027831,
    "exp": 1632063831
}
Implement client code to decode and store the id_token for later requests
Let's get back to the client code and implement our callback route
// client/src/routes/callback/CallbackPage.js

const CallbackPage = () => {
    const location = useLocation();
    const query = parse(location.search);
    LocalStorageManager.set(LS_AUTH_KEY, {
        id_token: query.id_token
    });
    return <Redirect to = "/"
    noThrow / > ;
};

export default CallbackPage;
We do have a LocalStorageManager utility to help us with dealing with serialize and deserialize data from the local storage.
// client/src/managers/LocalStorageManager.js

export class LocalStorageManager {
    static set = (key, data) => localStorage.setItem(key, JSON.stringify(data));
    static remove = (key) => localStorage.removeItem(key);

    static get(key) {
        try {
            return JSON.parse(localStorage.getItem(key));
        } catch (error) {
            localStorage.removeItem(key);
        }
    }
}
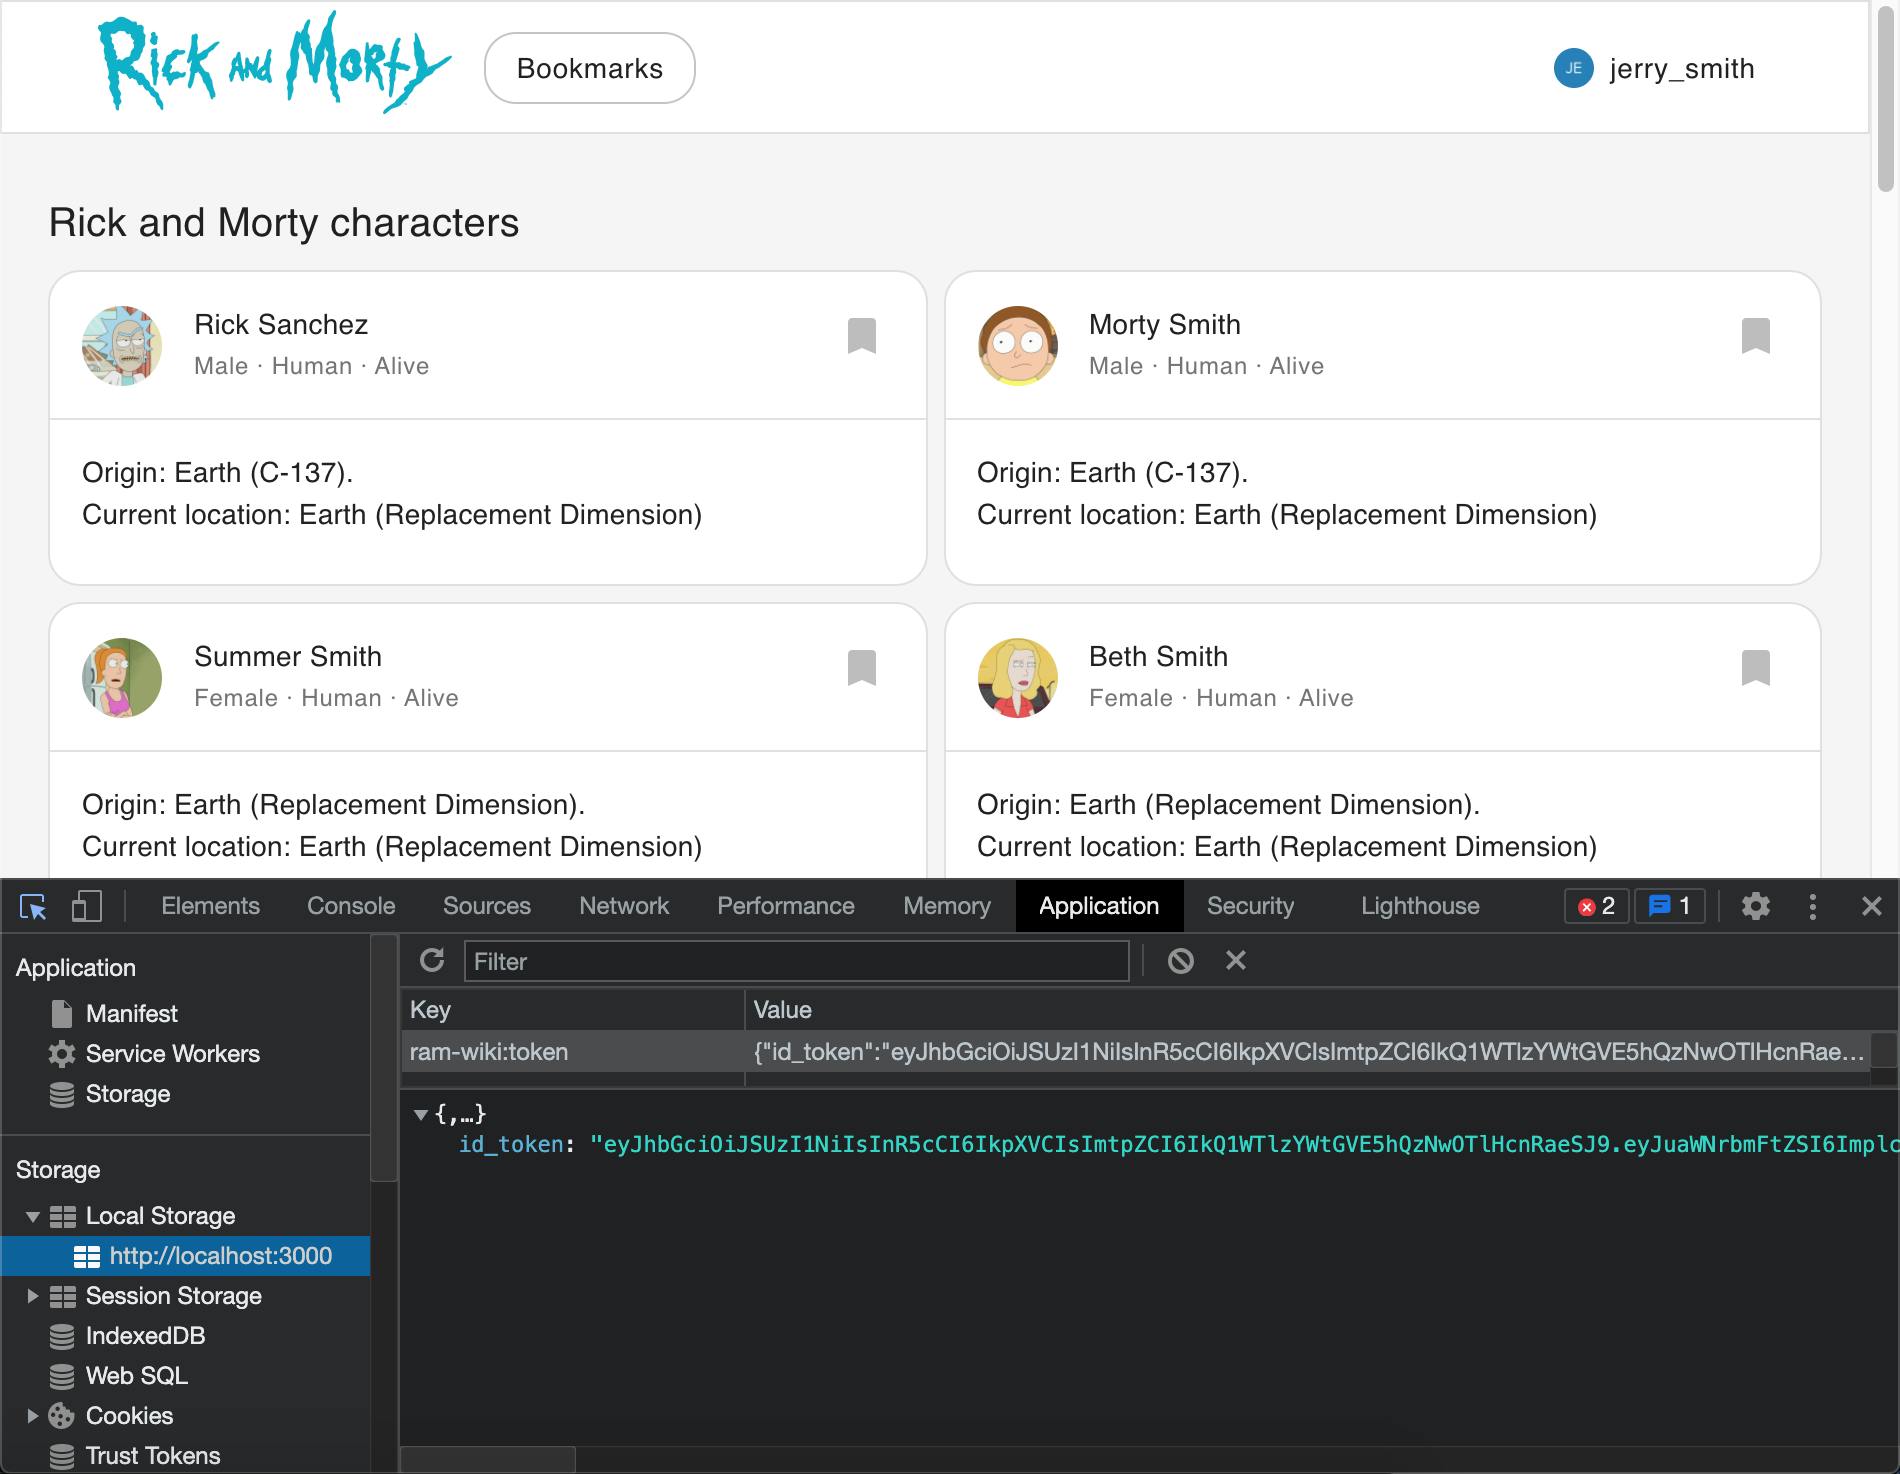
After this step, the id_token is stored in local storage and ready for consumption on other pages
Create a server-side API to return user information
Next step, let's create an API endpoint at localhost:8080/profile to return the current logged in user information
The server API is easy, nothing special here, we only decode the information from JWT and send it back to the client. But depends on your business, we can combine this with data from our owned database if need be
// server/src/routes/profile.js

router.get("/", checkJwt, (req, res) => {
    res.json({
        user: req.user
    });
});
In here we're using an express-jwt package to decode the JWT token and verify the integrity of the JWT key provided by client code, if the token expires, or is tempered, it will throw an authorization error.
There's some weird line in the code below regards to obtaining jwt secret. This code is specific for Auth0 and using the jwks package
// server/src/middlewares/checkJwt.js

import jwt from "express-jwt";
import jwksRsa from "jwks-rsa";
import {
    authDomain
} from "../config";

function getAuth0SecretKey() {
    return jwksRsa.expressJwtSecret({
        cache: true,
        rateLimit: true,
        jwksRequestsPerMinute: 5,
        jwksUri: `${authDomain}/.well-known/jwks.json`,
    });
}

export const checkJwt = jwt({
    secret: getAuth0SecretKey(),
    issuer: [`${authDomain}/`],
    algorithms: ["RS256"],
});
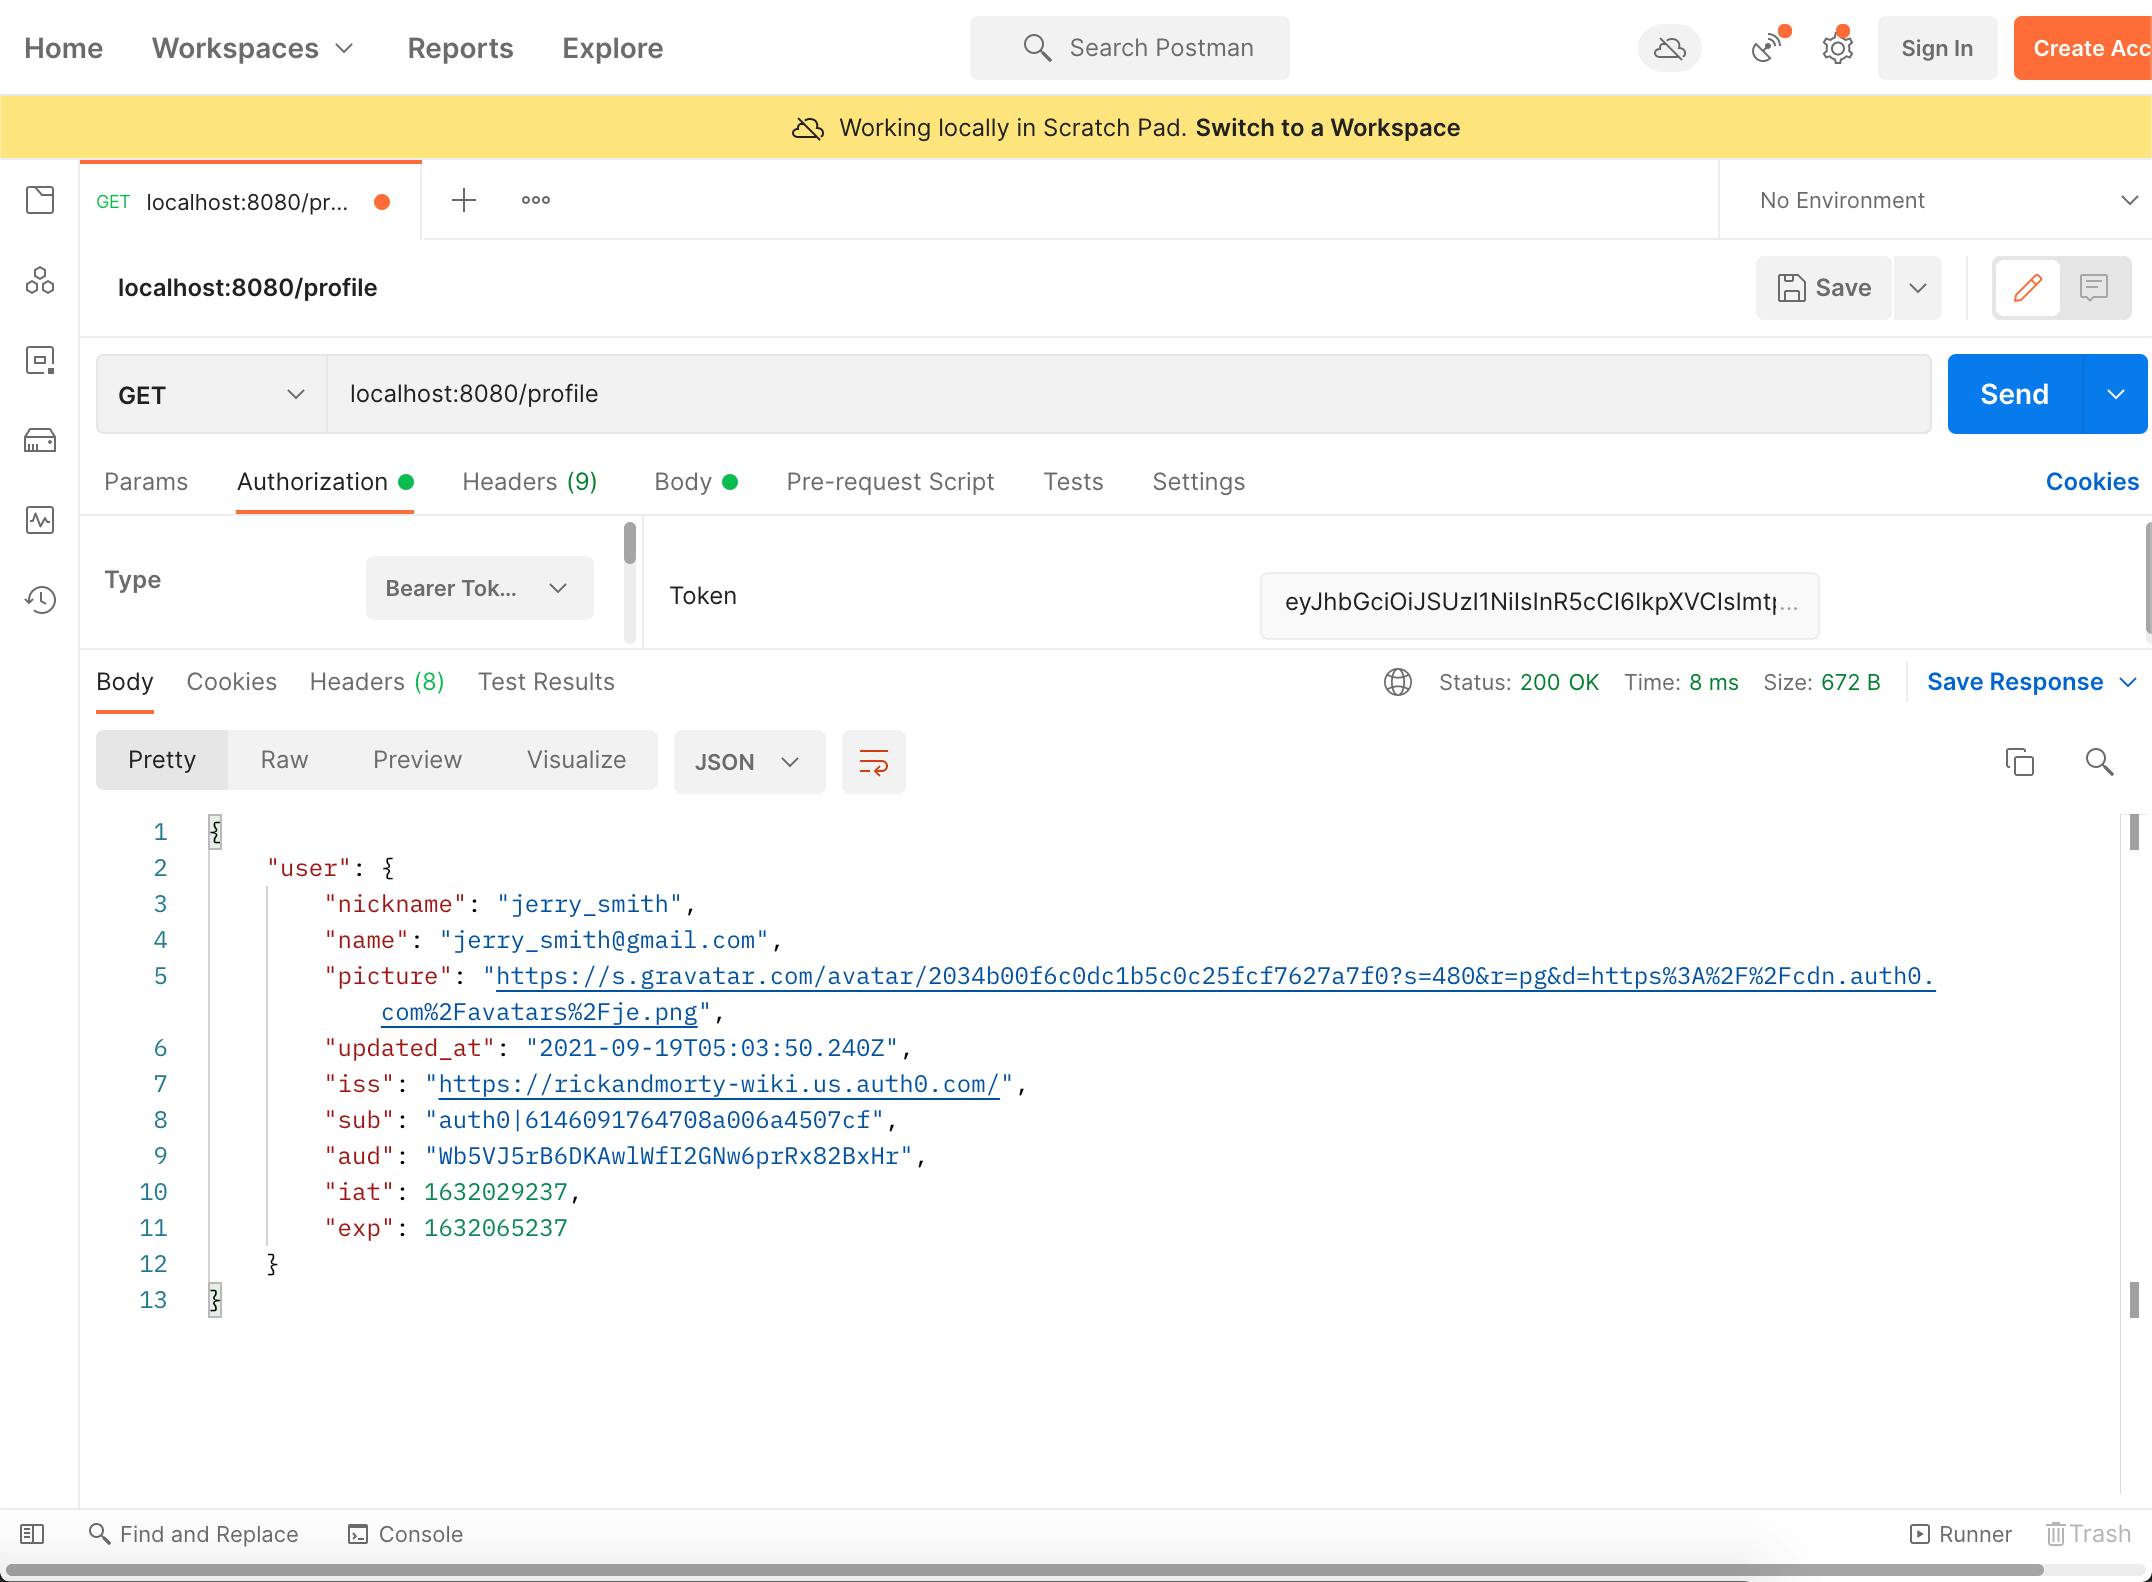
After this step, if we plug the id_token in the previous step into Postman and send the GET request to our endpoint http://localhost:8080/profile we should be receiving our data back in a neatly json formatted manner
Now we're having our API in place, let's head straight to the client code and implement our Auth Context
Implement AuthContext using React Context API to provide useful information for all pages
Since we will use the authentication data in many places in our application, the wise thing is to use context API to provide all pages with a means to access our user data.
Let's start small by creating an AuthContext object
// client/src/components/AuthContext/index.js

export const AuthContext = React.createContext({});
and then, the skeleton of the context provider AuthContextProvider. This will return an object that contains the actual user data, and 2 additional variables to handle the case of data loading or error
// client/src/components/AuthContext/index.js

const AuthContextProvider = (props) => {
  // Call /profile api to get the user data here
  const context = {
    user: null,
    isLoading: null,
    error: null,
  };

  return (
    <AuthContext.Provider value={context}>
      <div>{props.children}</div>
    </AuthContext.Provider>
  );
};
We'll use react-query and axios to obtain the data
const AuthContextProvider = (props) => {
  const { data, error, isLoading } = useQuery(["profile"], () => {
    const token = LocalStorageManager.get(LS_AUTH_KEY);
    if (!token) return null;
    const client = axios.create({
      baseURL: apiBaseUrl,
      headers: {
        Authorization: `Bearer ${token.id_token}`,
      },
    });
    return client.get("/profile").then((resp) => resp.data.user);
  });
  const context = {
    user: isLoading || error ? null : data,
    isLoading,
    error,
  };

  return (
    <AuthContext.Provider value={context}>
      <div>{props.children}</div>
    </AuthContext.Provider>
  );
};
Finally, let's throw in some code to handle error cases: when the token is expired and the server returns the 401 status code, let's remove the keys from the local storage. And this is the complete code
// client/src/components/AuthContext/index.js
export const AuthContext = React.createContext({});

const AuthContextProvider = (props) => {
  const { data, error, isLoading } = useQuery(
    ["profile"],
    () => {
      const token = LocalStorageManager.get(LS_AUTH_KEY);
      if (!token) return null;
      const client = axios.create({
        baseURL: apiBaseUrl,
        headers: {
          Authorization: `Bearer ${token.id_token}`,
        },
      });
      return client.get("/profile").then((resp) => resp.data.user);
    },
    {
      retryOnMount: false,
      retry: false,
      onError: (error) => {
        if (error.response && error.response.status === 401) {
          LocalStorageManager.remove(LS_AUTH_KEY);
        } else {
          throw error;
        }
      },
    }
  );
  const context = {
    user: isLoading || error ? null : data,
    isLoading,
    error,
  };

  return (
    <AuthContext.Provider value={context}>
      <div>{props.children}</div>
    </AuthContext.Provider>
  );
};

export const useAuth = () => useContext(AuthContext);
export default AuthContextProvider;
As you can see, we also added some additional useAuth helpers for easier access to the data
Next thing is to wire up the AuthProvider to the base of our application so that every page can receive the user
// client/src/App.js

function App() {
  return (
    <QueryClientProvider client={client}>
      <AuthContextProvider>
        <Layout>
          <Router>
            <HomePage path="/" />
          </Router>
        </Layout>
      </AuthContextProvider>
    </QueryClientProvider>
  );
}
The very last step is to consume our provider and give users some beautiful page in the header
// client/src/components/Layout/LoginButton.js

const LoginButton = () => {
  const { user, isLoading } = useAuth();

  if (isLoading) {
    return (
      <IconButton style={{ color: "white" }}>
        <CircularProgress size={20} />
      </IconButton>
    );
  }
  if (!user) {
    return (
      <Button component="a" href={loginUrl} variant="outlined">
        Login
      </Button>
    );
  }
  return <ProfileMenu user={user} />;
};
So now you've had it, full-featured authentication flow with React, Express, and Auth0 with only several files of code
Conclusion
In this post, we can see how easy it is for modern applications to integrate pre-built SSO solutions. The beauty of this is that we've been doing this from scratch without relying on the Auth0 provided libraries, so we can easily swap it with another vendor or open-source application later. As for the server-side, it's easy to use Python Flask or Go instead of NodeJS.
For the future post in this series, I will implement the rest of the Logout flow, as well as some create reuseable components for blocking users out if they are not logging in.
Again, this is the complete source code hosted in Github: Github and the demo application Rick and Morty wiki